Computational Deployment: Simulating A Rocket

The model rocket project has long been a favorite at the Academy. For the past fifteen years, students have designed, fabricated and then launched model rockets as the first project of the program. Over the years, I have tweaked the project several times, each time finding new ways to introduce authentic analysis in the process.

This year I have taken a deep dive into computational modeling, and as part of the rocket project, students were asked to create a simulation of their rocket prior to launch. In this post I will discuss how I did this, and how it turned out.

Simulating The Momentum Principle:

Prior to getting started on this, students investigated the causal relationship between forces and changes in motion. Using force sensors, carts, weights and elastic cords of different lengths, students began building a qualitative and quantitative model relating the momentum of a particle to the forces acting on the particle.

Screen Shot 2018-12-22 at 9.27.05 AM

In previous years, I waited to introduce momentum until after a significant amount of time was spent on forces, balanced and unbalanced. This year I decided to go directly to momentum. This is a bit of a break from the established modeling instruction sequence, but I think its a good alternative that is also suggested by the great textbook Matter and Interactions. The momentum principle can easily be modeled computationally and I think the students are able to grasp it conceptually.

I have included a link to a Google Doc that is the introductory activity that I created. My approach here, as it has been with this entire unit is to give the students guided questions that allow the students to discover and investigate the code required to simulate the momentum principle. This is my first attempt, and I am sure it will undergo many revisions:

Simulating The Momentum Principle

Introducing Conditional Behavior

One of the really great things about building a simulation of a rocket has three distinct phases of its trajectory – the thrust phase, the cruise phase and the descent phase. This gives the students three different phenomena to study and simulate: positive acceleration when two unbalanced forces are acting on the rocket during the thrust phase, free fall when the fuel runs out, and then constant velocity when the parachute has been deployed.

In order to simulate this, students needed a way to change the forces acting on the rocket at different time intervals. This is done using a conditional statement:

If This Then That

Conditional statements are very easy to create in Tychos – but they work a bit differently from other programming interfaces. Here is an example:

# The thrust force - F (thrust, rocket, fuel)
Ftrf = if (t < 1.8, [0, 6], [0, 0])

In this code snippet, a force is given a different value based on a condition, in this case whether the time in the simulation is less than 1.8 seconds. If it is, then the force is given a positive 6 value in the Y direction, and if the time is greater than 1.8 seconds, then the force becomes zero.

This allows the students to simulate the thrust phase of the rocket by having the thrust force disappear once the fuel has run out. We conducted tests on Estes C6-5 rocket engines in order to establish the time value. You can read more about how we did this here.

The students did the same thing to figure out when the parachute should deploy. Again this was established based on information from Estes as well as our own tests.

Comparing Simulation Data to Real Data

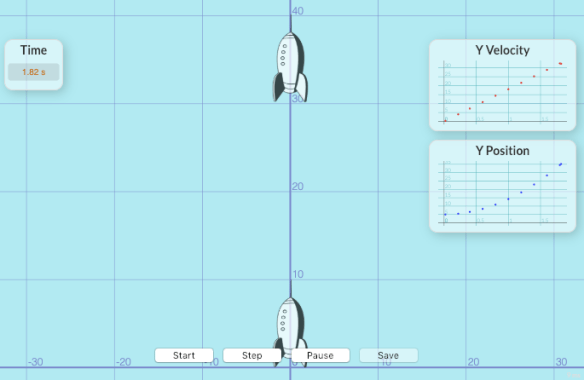
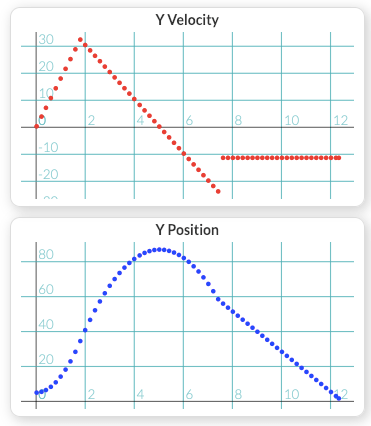
The students could analyze the simulated rocket behavior by using the graphing tools in Tychos. The students graphed the vertical velocity as well as the vertical position of their simulated rockets. Here is an example of what those graphs look like:

Screen Shot 2018-12-22 at 10.22.21 AM

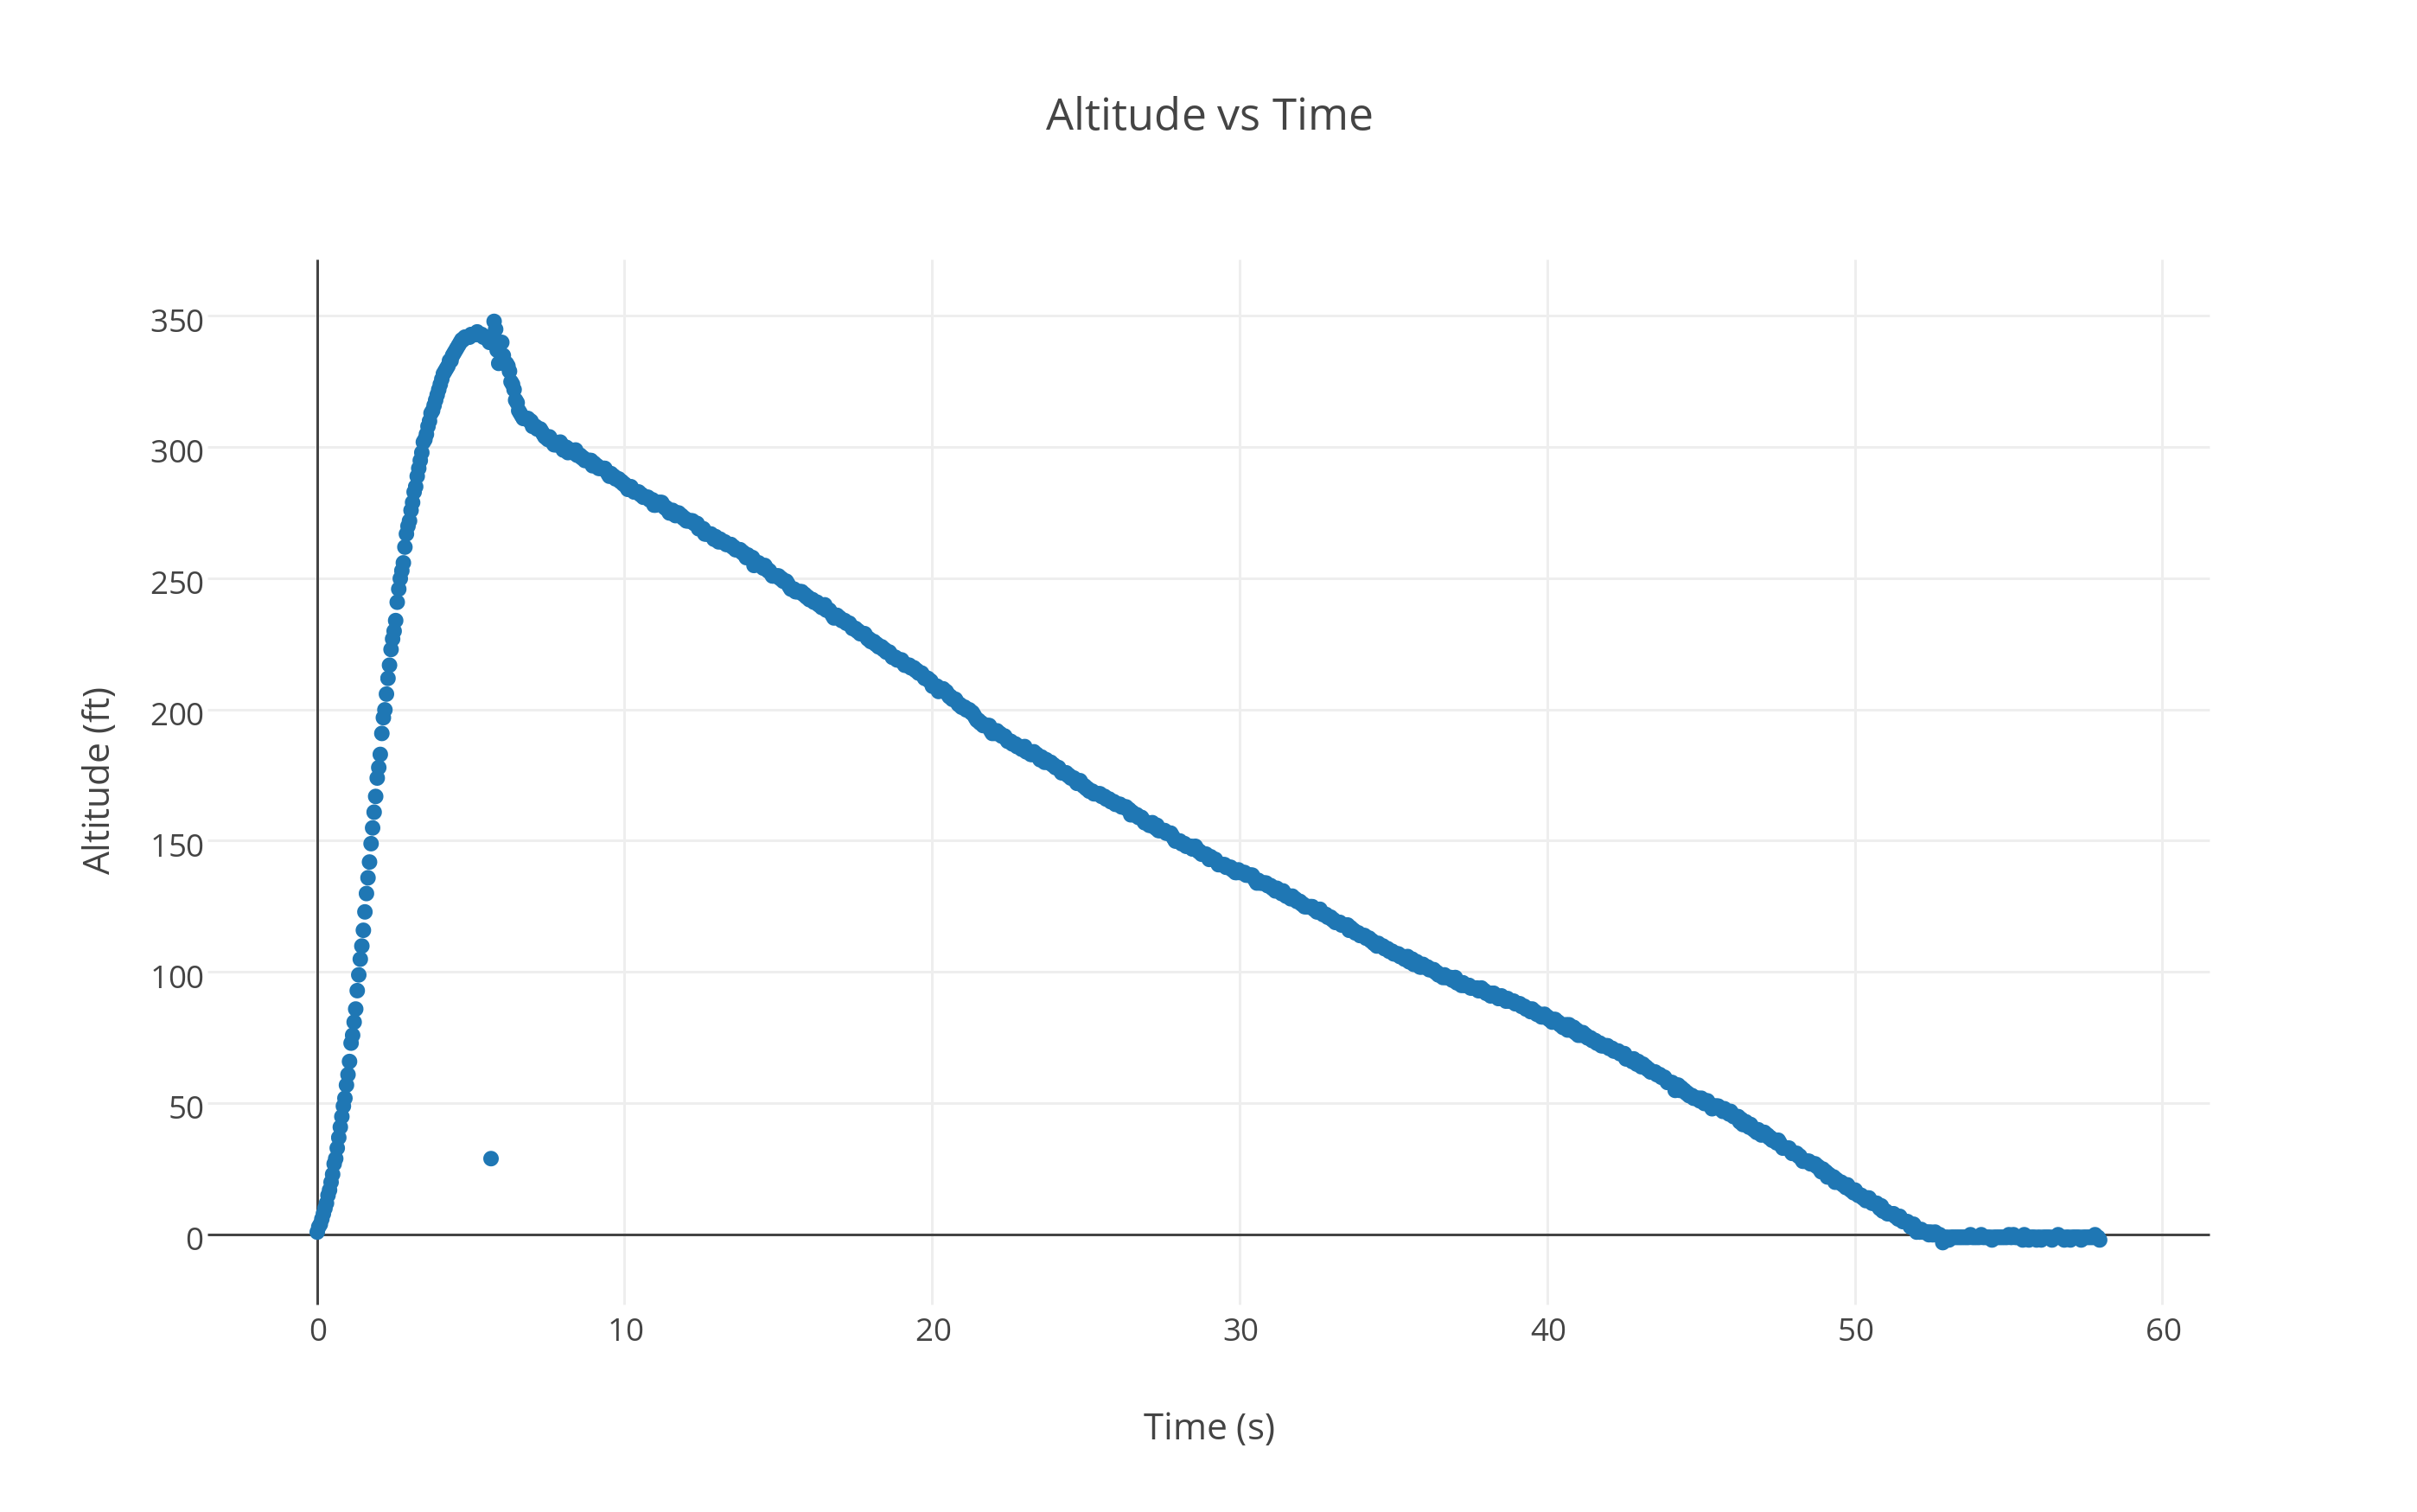
The last step of the process was for the students to compare their simulated data to the real data that was captured by the altimeter that we use in the rocket’s payload. Below are two images of the graphs of the data they retrieved from the rocket’s altimeter:

rocket_v_graph

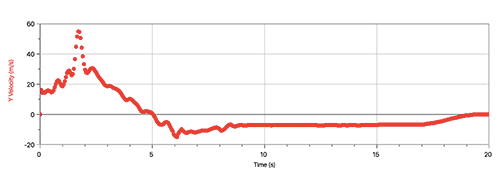
velocity data from altimeter – imported into LoggerPro

rocket_y_graph

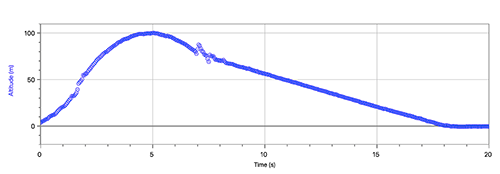
altitude data from altimeter – imported into LoggerPro

The shapes of the graphs from the simulated data and the real data are very similar! That was certainly exciting to see that the simulations were at least giving results that qualitatively matched the real behavior of the rockets.

Two factors that certainly created significant discrepancies between the real rockets and the simulated rockets was the existence of air resistance on the real rocket, and the fact that the real rockets didn’t always go perfectly straight up! We plan on modifying the simulations, but that will have to wait for a future post.

Simulate, Test, Analyze: A Framework For Rigor

trebuchet-launch---08_23970235271_o

“Have Fun Storming The Castle!”

At the end of this fall semester, the second year students in the Academy rolled and carried their medieval mechanisms of mayhem to the SRHS track and we spent the afternoon watching the devices hurl lacrosse balls across the athletic field.This project was the final performance assessment of the semester and required that students design a gravitationally powered projectile launcher. This is an age old engineering/applied physics project.

Like many engineering projects done in high school, the physics principles governing the dynamics of the project are quite complicated, and ultimately the actual “application” of the science principles is often cursory. Students don’t have the background or mathematical abilities to to do the complex calculations needed to make an optimization adjustment to their mechanical device.This leads to the disconnection between the science content and engineering practice. Students don’t have the ability to make an informed decision about design choices. This is because it is difficult, very difficult.

Over the past few years I have been very interested in addressing this problem. This post discusses a framework that I have been working on to incorporate science into engineering projects. I think this framework allows high school students to engage in difficult scientific analysis without overwhelming them.

A Framework For Rigor

I won’t claim that this is a perfect solution, but so far I think we have experienced some success in creating a tighter relationship between science and engineering.  Last December I helped conduct a workshop at the NCCPA Professional Development Conference in Petaluma, CA. The name of the workshop was “NGSS, Prediction Reports and Your Science Class” and the point of this workshop was to give the attendees a framework for incorporating the Engineering standards into the science curriculum.  My co-presenter (Vipul Gupta) and I focused on the creation of prediction reports using computer simulations as a way to address two very important standards in the NGSS framework:

Using Simulations with Informed Input

Computer simulations are very popular in the educational space. They give teachers and students a virtual space where students can interact with virtual lab equipment or virtual objects that behave similarly to physical objects in the real world. With that said, they can fail to address students misconceptions because they do not always succeed in linking a conceptual model to the physical behavior. I also believe that the best simulations are ones that output data that can be analyzed with other scientific/mathematical tools. I also think that a good simulation requires that students provide meaningful input that gives them opportunities for analyzing the relationship between the input and the output.

Simulations used in engineering projects can be extremely helpful in addressing one of the main problems in engineering education. Students often design and build mechanical devices without understanding the physical principles that govern the design. The design process becomes an exercise in trial and error, or simply is reduced to copying a design from the internet.

To do a predictive analysis of a rocket’s flight, or a bridge’s structural performance is extremely difficult and often requires advanced mathematics and physics. Simulations can give the students the ability to analyze their designs and understand how changing the design inputs affects the output. Once again, it is important to find a simulation that requires students to understand the inputs and outputs.

Virtual Trebuchet

For example, in our project, students were introduced to an online Trebuchet simulation tool. This simulation tool is great because it requires that the student learn how to measure and calculate certain inputs. The students must have a working knowledge of rotational inertia, center of mass, and other concepts before they use the simulation. This was ideal for our project because it gave students a relevance and motivation . They had learn about these concepts in order to actually use the simulation. The students could then change certain inputs and see how that would change the efficiency of the design, or the range of the projectile. The point is that they needed physics knowledge in order to use the tool. They might not have the ability to know how the simulation eventually calculated the output, but they knew that the simulation required an understanding of the inputs.

IMG_2674

Example Report

The Prediction Report

The next step is to ask the students to prepare a prediction report. This report is designed to get students to demonstrate their understanding of the inputs, display evidence of the required calculations or measurements needed to create the inputs and then analyze the simulation outputs. In the report for this project, I asked students to show a set of calculations and measurements for determining the center of mass of their throwing arm and the rotational inertia (moment of inertia). Students also had to provide similar information for the counterweight.  The students then had to run the simulation and document the outputs from the simulation.

The Test:  Data is Needed

The next step is to test the device. To make this step more rigorous and to be able to relate the scientific analytical process to the engineering process, it is crucial for the students to collect data that can be used to analyze the performance of their device/product and then reflect on how they would improve their design.

For this project, we decided to use high-speed video and Vernier’s LoggerPro video analysis software to plot the position of the projectile as it was launched from the device.

The Analysis

The analysis is actually broken into two parts. The first part requires a collection of calculations while the second part uses those calculations to make some qualitative assessments.

For example, in the above project, students had to use the collected position data from the video analysis tool to calculate the kinetic energy of the projectile and then the efficiency of the device. They had to be proficient at the analytical tool, which in itself requires physics content knowledge, providing once again an opportunity to apply scientific models in the analysis portion of this engineering project.

I have included the instructions for the analysis report here: Projectile Launcher Analysis Report.

Finally, students are given the opportunity to use the information gathered in the analysis report to reflect on their design, and more importantly use the information to inform how they would improve on a future design. I have included below the set of questions that I asked my students:

  1. Compare the efficiency calculation of the simulation to the efficiency rating that you calculated for your actual performance. Please describe why you think these values are not the same.
  2. Consider the design of your trigger. What design and fabrication decisions would you change in order to improve your trigger, AND explain WHY you would make those changes.
  3.  Consider the design of your sling. What design and fabrication decisions would you change in order to improve your sling, AND explain WHY you would make those changes.
  4. Consider the design of your release mechanism (called the nose). What design and fabrication decisions would you change in order to improve this mechanism, AND explain WHY you would make those changes.
  5. Consider the design of your arm. What design and fabrication decisions would you change in order to improve your arm, AND explain WHY you would make those changes.
  6. Consider the design of all other components and the overall design. What design and fabrication decisions would you change in order to improve your device (other than the trigger, sling and arm), AND explain WHY you would make those changes.

Conclusion

The overall design of this framework can be boiled down to this:

  • Engage students in a computer simulation that simplifies the process of modeling and analyzing a complex physical/chemical/biological process, but be sure that the simulation requires some conceptual and computational thinking.
  • When testing the performance of the design (bridge, rocket, etc.) make sure that the students are required to  collect data that can be analyzed and that once again demands that they apply their theoretical models.
  • Design an assessment that uses the analysis and gives the students an opportunity to make informed judgements of their designs for the purpose of redesign.

A Modernized Bridge Design Contest

IMG_0283

Modernizing An Old Classic

We have just completed the second project in the Academy for the 2014-15 school year. It was a huge success! This project takes a classic physics project and “upgrades” it by incorporating modern engineering design technology and fabrication techniques.

We started with a great project that is now available online through Engineering Encounters. This was a project that was originally published by Stephen J. Ressler of the United States Military Academy. It is a rigorous approach to designing and building bridges from file folders:

https://bridgecontest.org/resources/file-folder-bridges/

Its a great project with an incredible set of resources, background information, and step by step instructions. Unlike less rigorous and involved bridge design projects (using toothpicks for example), this project has the students building compression members (beams) and tension members (cords) and gussets to better model real world designs and to give the students the opportunity to learn and make decisions about which members to use in different parts of their own designs.

The only issue that we had with this project is that it requires the rather tedious process of having students trace out the unfolded beam designs onto file folder material and then use scissors and  blades to cut out each beam and cord. But we have a laser cutter! There had to be a way to incorporate both 3D CAD design and our laser cutter in order to modernize this process. We also knew that Autodesk Inventor had some really amazing tools for analyzing design structures.

From Sheet Metal To Manila Folders

Autodesk Inventor has an amazing set of tools for designing sheet metal parts. Using these tools, an engineer can construct 3D models made of folded metal parts made from just about any thickness of metal stock. Once you have designed the folded metal part, Inventor will create a flat pattern design for you that you could then send to a CNC plasma cutter to cut from sheet metal stock. You would then fold the part up manually and you would have your folded part.

Inventor gives you the ability to custom define the thickness of your stock, and some of the parameters around how it can be bent. We defined our stock to be as thick as manila folder paper. The next step is a bit tricky, but with the help of a great video I came across from Rob Cohee, we were able to define custom folded paper beam stock that the students could then use to build out their frames. Once again, Inventor has an amazing set of tools for defining structural frames (called The Frame Generator) that can then be populated with any kind of structural beam. You can also define your own structural beams that can be used to populate your frame.

I have included a video below that we use with the students to help guide them through this process:

Using the frame generator tool in Inventor also allows the student to miter and trim the beam members, which allows the students to focus on design rather than getting lost in the time consuming process of calculating the cut angles. The following video shows you how this can be done:

Once the students had designed the bridges, it was time to prepare the flat patterns and have the laser cutter do the work of cutting them out.

Fold, Glue, Repeat. (Some Assembly Required)

IMG_0353

The students prepare their flat pattern cut-outs for the laser cutter and then you let the laser “rip”! Its awesome to sit back and watch this machine cut. I never get sick of watching it! Having the students do this would take SO much longer, the cut parts would be less accurate, and as all CTE teachers know, one of the most dangerous tools in the shop is an Exacto blade.

IMG_0355

Some might argue that the “manual” process of cutting all these beams out by hand is “good for the students”, but we feel that saving time here allows us to use that time in other areas, such as virtual testing.  Before the students get to build their design, we ask them to use Inventor’s frame analysis tools to help them analyze potential weaknesses in their designs. The following video shows just how amazing this tool is:

Once the students have done their analysis and cut their construction members, its time for folding and gluing, and folding, and gluing, and … At this point our project does not differ from the Engineering Encounters project. The students use a sheet of paper (actually two 11 x 17 sheets) with an elevation view (printed from Inventor as a CAD drawing) glued to a board as a guide for assembling the beams, cords and gussets:

IMG_0351

IMG_0362

This process goes relatively quickly as the students have done all the prep work to make sure that the pieces all fit together. Once again, this really demonstrates how modern technology can allow the students to focus their attention on design.

To Break Or Not To Break

Once the bridges are assembled, its time to test them out. The performance metrics for the contest are not actually based on the strongest bridge but rather a more realistic approach. We have attached a monetary value to each beam, gusset and cord. The bridges are then tested to a set value – the required load. The bridge that holds that load and is “manufactured” least amount of money is then given the highest marks.

Once the bridge has been tested at the required load, we then give the students the choice to see just how much the bridges can hold before catastrophic failure. Most students (encouraged by both peers and staff!) decide to take their bridge to the limit.

Its always a fun way to end the project!

Simulating Planetary Motion (Using Code!)

Simulating Newton’s Law of Universal Law of Gravity

Interactive simulations (like those created by the University of Colorado – PhET) can be really nice for impressing students, and giving them a way to explore the dynamics of a simulation. If incorporated into a lesson well, they can add to the active learning process. The question that I always struggle with though is “are the students learning how the simulation works, or are they learning how nature works?”

I have a nagging feeling that the students would possibly get more out of being able to see the simulation source code, specifically the rules of behavior of the simulation, and then through “tweaking” the code, see how those rules govern behavior. I would like to develop curriculum that would allow my students more opportunities to explore the code “behind” the simulations. This presents a few challenges that have been identified by other great physics educators, and if you are thinking about doing the same thing – I would suggest reviewing their insights. I include a quote from Ruth Chabay’s brief, but very interesting article on this topic:

To integrate computation, especially programming, into an introductory course, it is necessary to minimize the amount of non-physics related material that must be taught. To do so it is necessary to teach a minimal subset of programming constructs; employ an environment and language that are easy to learn and use; ensure that program constructs match key physics constructs; provide a structured set of scaffolded activities that introduce students to programming in the con- text of solving physics problems

This was my first attempt at doing just this, and I had some success and realized that I have some work to do.

Which Code?

A popular programming language in the Physics Modeling community is VPython. I have chosen to use a different language to use called Processing. There are reasons I chose this language, but I am sure there are reasons one would choose VPython (or other languages). At this point, I have not had the opportunity to work with VPython, so this post will not attempt to compare Processing to other languages. Perhaps I will do so in the future…

Here are some general reasons why I like Processing:

  1. It’s free and open source.
  2. Because its built on a visual programming interface, its really easy for the students to create visual content on the screen, and it is very easy to create visual animations due to the embedded “draw” loop.
  3. The official website has great examples and tutorials. It is full of great code samples and quick tutorials. You can loose yourself for hours (or days!) just having fun exploring the examples and tutorials.
  4. The IDE is simple and very similar to the Arduino IDE, so if you plan on doing any Arduino programming, the similarity is nice for the students.
  5. There is a nice vector library for doing vector operations (.add, .mult, .norm, .dot, etc.)
  6. Its object oriented so that you can have the added benefit of teaching important programming concepts – though this might be why some people might not like it.

The Simulation

The simulation that the students were introduced to was a simulation that modeled Newton’s Law of Universal Gravitation. The students were given some instructions on the basic structure of the program, and I made sure that there was some guiding comments embedded in the code. This program was inspired/adapted from a similar program created by Daniel Shiffman who has also written an amazing book on simulating nature through code called Nature of Code.

The program defines two classes. First, there is the parent class called Particle. This class defines some basic attributes like location, velocity and acceleration as well as mass. It also has some basic functions that allow it to move and allow it to respond to a force. The second class is the child class called Planet. It can do everything that a Particle can (because it inherits from the Particle class), but it can also exert an attractive force on other Planets.  Here is the code below:

/* A parent class for all moving particles
class Particle {
  PVector location;
  PVector velocity;
  PVector acceleration;
  float mass;

  Particle(float x, float y, float m) {
    mass = m;
    location = new PVector(x, y);
    velocity = new PVector(0, 0);
    acceleration = new PVector(0, 0);
  }
  
  void applyForce(PVector force) {
    // Newton’s second law at its simplest.
    PVector f = PVector.div(force,mass);
    acceleration.add(f);
  }

  void move() {
    velocity.add(acceleration);
    location.add(velocity);
    acceleration.mult(0);
  }
}

/** 
 This class defines an object that behaves like a planet.
 Planet objects extend Mover objects, so they can move. They
 also can attract other planet objects.
 **/
   
class Planet extends Particle {

  float size;
  float G = 1;

  // To create a planet, you need to supply coordinates, mass, and size
  Planet(float x, float y, float m, float s) {
    super(x, y, m);
    size = s;
  }

  // This function allows a planet to exert an attractive force on another planet.
  PVector attract(Planet p) {

    // We first have to figure out the direction of the force
    // This creates a unit vector for the direction
    PVector force = PVector.sub(this.location, p.location);
    float distance = force.mag();
    distance = constrain(distance,size + p.size,500);
    force.normalize();

    // This is where we use Newton's Law of Universal Gravitation!
    // The stength of the attraction force is proportional to the
    // product of the mass of this planet and the mass of the other planet
    // as well as the value of G. It is also inverseley proportional to
    // the distance squared.
    float strength = (G * mass * p.mass) / (distance * distance);
    
    // To get the final force vector, we need to 
    // multiply the unit vector by the scalar strength
    force.mult(strength);

    // Return the force so that it can be applied!
    return force;
  }
  
  // Just displays the planet as a circle (ellipse)
  void display() {
    stroke(255);
    fill(255, 100);
    ellipse(location.x, location.y, size/2, size/2);
  }
  
}


/** 
  This program simulates the gravitational interaction between planet objects
  **/
  
Planet planet1;
Planet planet2;

void setup() {
  background(0);
  size(800,800);
  // Inputs for each planet:
  // (x, y, mass, radius)
  planet1 = new Planet(width/2,height/4,6000,60);
  planet2 = new Planet(width/2,height/1.25,6000,60);
  
  // This is where you can change the initial velocities of the planets.
  planet1.velocity.x = 0;
  planet1.velocity.y = 0;
  planet2.velocity.x = 0;
  planet2.velocity.y = 0;
}

void draw() {
  background(0);
  
  // f1 is a force vector that is created by calling the planet's attract function
  PVector f1 = planet1.attract(planet2); 
  // Now apply that force on the other planet.
  planet2.applyForce(f1);
  // Now deal with the opposite force pair
  PVector f2 = PVector.mult(f1, -1);
  planet1.applyForce(f2);
  
  // Allow the planets to now move.
  planet1.move();
  planet2.move();
  
  // Display the planets
  planet1.display();
  planet2.display();
}

Experimenting With The Code

The students could change the initial values of the planets, such as the starting positions, the masses and radii by changing the input values of these two lines of code:

planet1 = new Planet(width/2,height/4,6000,60);
planet2 = new Planet(width/2,height/1.25,6000,60);

The planets initial velocities could also be modified by changing the values assigned in these four lines of code:

planet1.velocity.x = 0;
planet1.velocity.y = 0;
planet2.velocity.x = 0;
planet2.velocity.y = 0;

The code that actually guides the strength of the gravitational attraction between the two planets is actually very simple. This is the magnitude of the force as defined by Newton’s Law of Universal Gravity in code:

float strength = (G * mass * p.mass) / (distance * distance);

There is some slightly complicated code that controls the direction of the force and how that force is then applied to the planet object’s state of motion, but I didn’t have the time to explain this, which was a bit disappointing (see below).

For The Future

I am currently really interested in incorporating programming into the academy program, but have found myself a bit intimidated by the challenges identified by Ruth Chabay. The most significant challenge is time:

In an already full introductory physics curriculum, there is little or no time to teach major programming skills. Students who are new to programming are also new to the process of debugging; teaching debugging strategies requires even more time…Working on programming activities only once a week in a lab or recitation section may not be adequate to keep knowledge of syntax and program structure fresh in the students’ minds.

I plan on taking some time this summer to see how I could integrate computer programming more significantly into the curriculum without causing the learning of Physics to suffer – that would of course defeat the purpose!

We Have Lift Off!

15414703973_b0258a08ca_h  15846865828_b08d8515cd_h 16033503742_be978fd9ca_h

This is a follow up post to Modeling A Rocket’s Journey – A Synthesis where I described how the students in the first year program were engaged in creating a predictive report for their model rockets. I want to emphasize that these model rockets were not kits. Each rocket was designed using 3D CAD software, and each component was either fabricated from raw material, or was created from material that was not intended for use in model rocketry. The only exception to this is the actual rocket motor.

The next step was to launch the rockets and have the altimeter payload collect altitude data.

Launch Conditions – A Bit Soggy

Unfortunately the week of our scheduled launch happened to be a week of some pretty hefty rains. We rescheduled the launch twice before finally accepting the soggy launch conditions. With umbrellas and rain jackets, we trudged out to the baseball diamond and got to work setting up for the launch. We had some minor difficulties in the wet weather, but eventually had a very successful launch day.

Most of the rockets were able to launch and deploy their valuable payload – the Pnut Altimeter.

15414689283_8197c70584_h

The students seemed very excited to finally see the rockets launch, and to see the successful deployment of the parachutes. Although we all got a little wet and muddy, we had a great time!

The Altimeter Data

The altimeters use a small barometric pressure sensor to collect altitude data (the altimeters also contain a small temperature sensor and voltage sensor). The altitude is recorded in feet every .05 seconds. Here is an example of one rocket’s recorded flight data:

altitude_vs_time

https://plot.ly/~stemples/9

The students were then asked to use the data to create a comparative analysis report. I will detail how the assignment was set up and also discuss how the students performed on this assignment. That will be for another post.

I want to also thank Mr. Kainz for his amazing photos that are displayed here.